Sunday, 20 June 2010

Vintage Fathers Day Card


Hello and welcome to my new card. It's Fathers Day so what better card to show you than the one I made for my Dad...


All papers used were made by me on the computer and printed on hessian embossed card..
The picture used on the front was sourced from the internet and is called La Scapigliata by Leonardo Da Vinci. Her hair is "highlighted" with very small gold stitches ( I apologise for my stitching. Sewing is not one of my strong points)
"DAD" was first stamped using Anna Griffin "Elegant Engraving Alphabet" clear stamps and again hand stitched and rhinestones added.
The hinge, lock and key were made using Tim Holtz Alterations Hardware Findings die, thick grey cardboard that was inked with Tim Holtz Distress inks - Frayed Burlap, Vintage photo and Firebrick red. Then they were inked with VersaMark ink and heat embossed with Tim Holtz Distress embossing powder Black soot. I used the die in my Cuttlebug using the sandwich - B plate, die (cutting side up), card then B plate again. I ran it through twice to make sure it went through the card.
The flourishes on the inside were made with Tim Holtz Alterations Elegant Flourishes die and hand stitched on.
The passage was printed on Jacquard Inkjet Silk, and the word love was again hand stitched. The font used is FranciscoLucas llana, a free font from abstract fonts.
And here's the present I gave to my Dad


Thank you for looking and Take care & keep smiling

Sunday, 6 June 2010

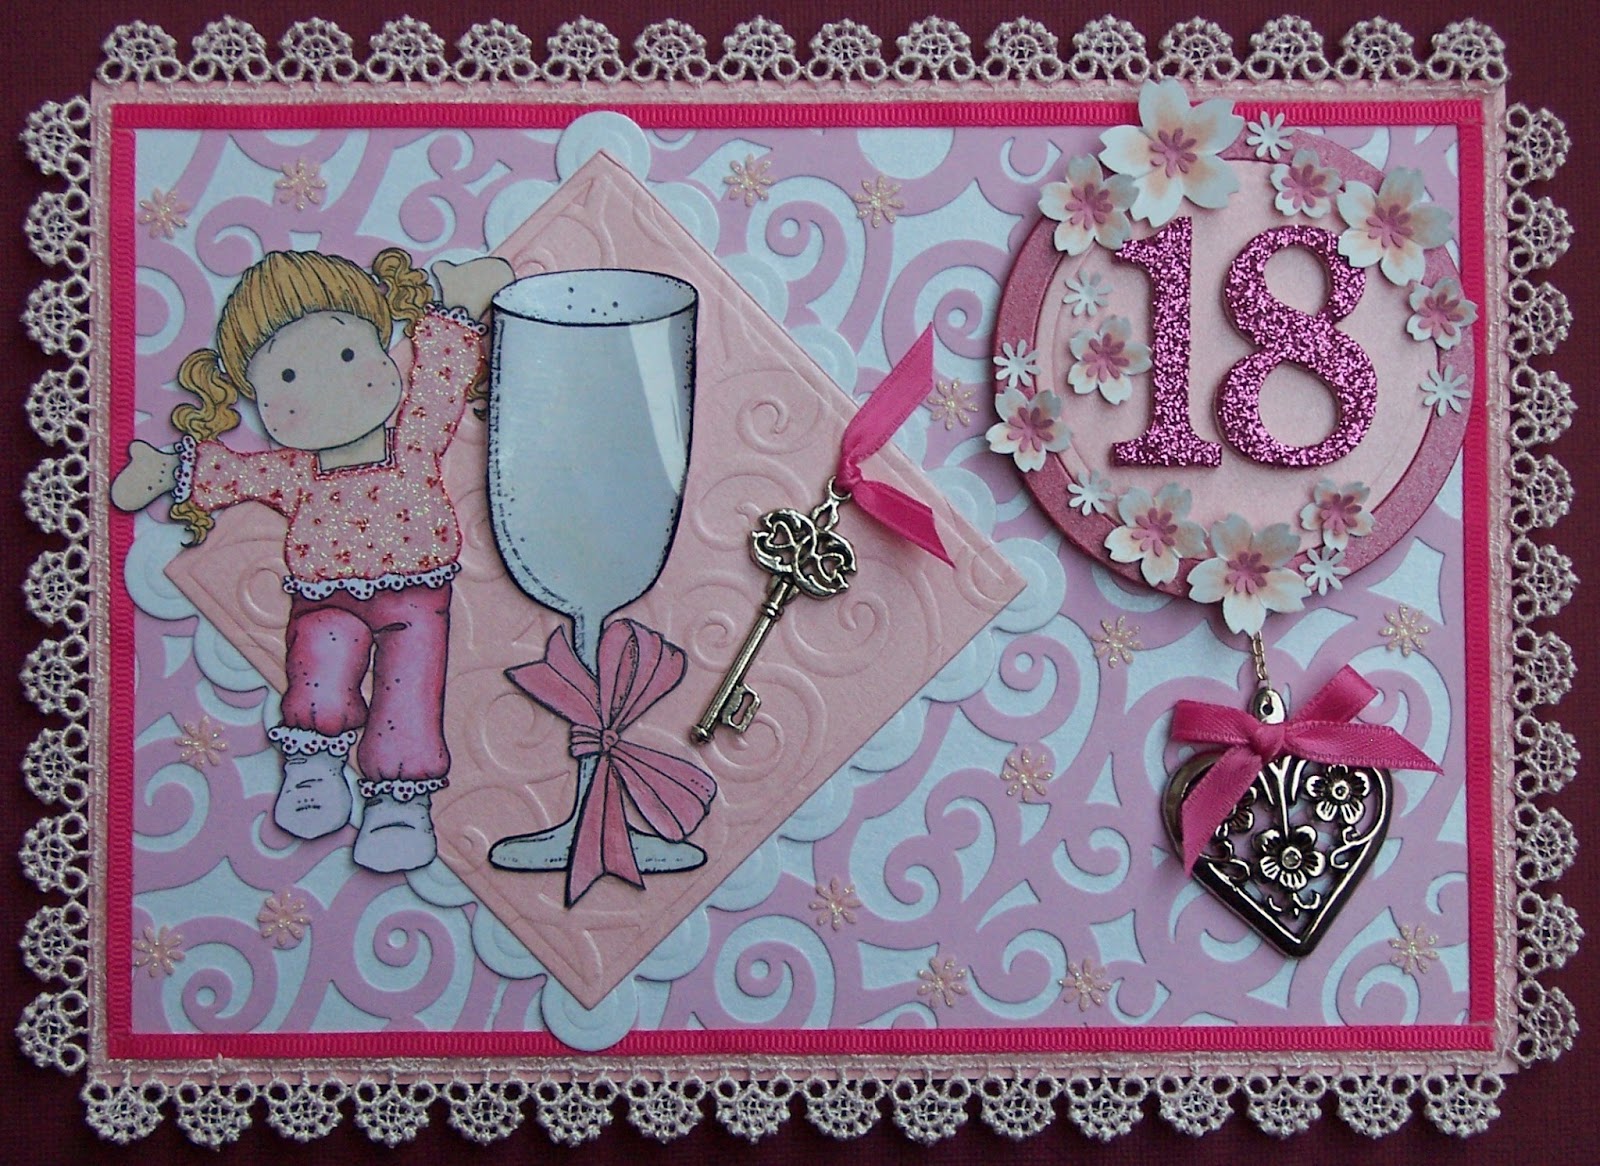
Happy Tilda 18th birthday card, gift set


Tilda strikes again :o) This time for an 18th birthday. I was asked to make this card for a girl who is girly but loves football AND she absolutley adores the husband of Belinda (lady who requested the card). The snag to this is the birthday girl and the husband both support different teams, who happen to be bitter rivals in the world of football. So how to combine all those facts into a card... well here's what I did (lots of photo's, click on them to see more detail) ...

Bazzill card stock - Flowers, covering picture frame and picture mount.
Stardream pearlescent card - base card, square, star and circle Nestabilities,.
Creative Imaginations Samantha Walker Die Cut swirl card
Glitter paper - flowers, Tilda's top.
Shimmerz paint - "Angel Wings" on champagne flute, "Poinsettia Pink" on footballs.
Smooch paint - champagne flute ribbon.
Atyou glitter pens - Football badges and sentiment.
Tim Holtz - flowers
Rubber Stamps - Happy Tilda and Champagne flute by Magnolia Rubber Stamps - coloured with Derwents Coloursoft pencils and Sansodor.
Printable acetate.
Bling on a budget rhinestones.
K&Co paper lace - inside card.
Numbers 1 and 8 - bought from Hallmark Cards.
Pink cotton lace and ribbons.
Metal key and heart bought from eBay.
Cherry Blossom multi punch by Woodware.
I'm not going to go into great detail as to how the card was made, but the insert backing paper was made by me using a football image sourced from the web and then changed to pink. I then painted over the pink parts with Shimmerz paint. The football badges were sourced from the web changed the colours to various pinks and then coloured over with Atyou glitter pens.
Tilda's top was my first try at paper piecing, I used Stazon Rocket red ink on pink glitter paper and then went over it with a Staedtler fine red pen.
Thank you for looking and take care and keep smiling

Saturday, 8 May 2010

Traveller Tilda Leaving Card


(sigh) I made this card for my lovely team leader Michelle who has moved on to pastures new. I knew I wanted to use the Traveller Tilda stamp but wasn't quite sure what else to do, but once I started I found it VERY hard to stop LOL.


1. DP (designer paper) used through out the card and on the box - Making Memories/Forest Green series. Stardream Pearlescent card. Bazzill cardstock.
2. Punches used - Martha Stewart's Deco Fan border punch and Frond Branch. Nellies' Choice Floral punches and embossers. VERY small daisy punch - unknown make. Corner rounder punch.
3. Stamps used - Magnolia Rubber Stamps - Traveller Tilda, Suitcases and clock. Alota Rubber stamps - Wall/window. Watercolour Stamps - cobblestones.4. Embellishments - Tim Holtz - Journalling tickets. K & Company - paper ribbon. Bling on a Budget - Rhinestones/gems.
5. Other items used -Derwents Coloursoft pencils and Sansador (Colouring in stamps) Tim Holtz Distress ink pads (flower centers and card edges). Sakura clear Gellyroll glaze pen (clock face, eyes, buttons, case handle)) Krylon Copper pen (colour banding on suitcases) Atyou glitter pens (wording on front of card, Tilda's hat flowers). Pink glitter card (flower centres)
6. All sentiments/wording - computer generated. To get the wording on the journaling ticket, I first printed the words onto a piece of A6 card then using a small piece of double sided tape I positioned the ticket over the words (I held the paper up to the light to get it right, if you've got a light box that would be even better) then fed it through the printer again.
So there you have it, I really enjoyed making this card, though I didn't like the reason I made it, I shall miss Michelle, but I am very happy that she is finally getting to where she wants to be.
Thank you for looking and take care & keep smiling

Tuesday, 20 April 2010

Oriental Koi Carp Birthday card


Hello, couldn't wait to use my new toys - Dreamweaver stencil and paste. WHAT A NIGHTMARE. The lady demonstrating made it look so easy, I on the other hand, made an epic saga out of it LOL. But I got there eventually, and I'm quite pleased with the result...


1. The main image is made from a Dreamweaver stencil and black matt paste on printable acetate, that was then hightlighted/painted with Shimmerz "December Sky" paint, then mounted onto Stardream "Lapis Lazuli" pearlescent card and edged with gold peel offs.
2. The square and circle panels were made with the same Starcream card using Nestablities dies then embossed used my Cuttlebug and "Victoria" embossing folder. I then sponged over the raised parts with Brilliance "Pearlescent Ivy" and "Gamma Green" inkpads. The circles were edged with peel offs and the squares mounted onto gold satin Mirri card.
3. The patterned card is called "Precious Peonies" by Hunkydory crafts. And the only embellishments added were the Chinese brass coins.
Right I'm off now to have a go at another card, this time I'm going to get my Tilda stamps out :o) And I MIGHT even have another go at another altered tin, not sure yet, see how the mood takes me. So until the next time....
Take care & keep smiling

Wednesday, 24 March 2010

Vintage Card - Gift set - Part 2


Hello again, and as promised here is the second part to my gift set. I bought a mug from the store that I work at because it was in a tin. Didn't want the mug but I had an idea for the tin, and as it was only £2 it was worth buying just for that :o) This was also my first attempt at altering, and I was very happy with the result ...


All the papers used for inside and outside the tin are by Graphics 45. The lable is computer generated, distressed with Tim Holtz inks and stamp with Basic Grey flourish stamp. The bead trim was first sewn onto the ribbon before being attached to the tin (I hate sewing LOL) The foliage was made with Martha Stewart and L-Em punches.


And here they are together. Just wish I'd have bought more of those tins, I really enjoyed decorating it, oh well maybe they'll have more in another time :o) Thank you for looking.
Take care & keep smiling

Tuesday, 23 March 2010

Vintage Card - Get well - Part 1


Hello, I've gone all vintage AGAIN :o) I love it, and I think I'm slowly getting better at it. It's one of those styles that just about suits everyone, male or female, and as I wanted to make a card for my friend Tracey who's just had a back operation, I thought this style would be perfect. As you can see from the title of this post this is part 1 as there are LOTS of photo's as I not only made a card I also altered a tin to make a gift set. So here we go ....


In this picture the card is in the box I made for it. You might be thinking what are those black lines on the girls faces? Well I scanned the DP I used for the card and through my graphics programme I changed it to black and white, then into a negative and then printed it onto printable acetate, and then used it to make a "window" in the box lid. Below is a picture of the lid with some white paper behind it so as you can see the printed acetate better. You can click on the photo to get a better look if you want to.


1.The main image is from the internet, unfortunately I can't remember who the artist is.
2. The DP or backing paper is from Graphics 45 "Botanicals" range.
3. The flowers were made by me using EK Success medium flower punch and red vellum
4. The torn letter is a rubber stamp by EK Success - "Parchment Script". Stamped onto parchment, which was then screwed up, distressed and aged with Tim Holtz distress inks ( I don't know how I ever lived without these inks)
5. The Butterfly is a Martha Stewart punch.
6. The sentiment is computer generated aged as above and then double heat embossed.
7. And if you're wondering, the cherub is a button by Dress It Up.


1. The main DP/backing paper is from a CD by Bearly Mine Designs.
2. The pocket for the postcard was again made with the same printed acetate. The "lace" trim was made with Martha Stewart's Doiley Lace punch and Fiskars Leave it to Weaver punch, aged again with Mr Holtz's inks.
3. I loved the postcard I made for a previous card so I decided to do it again for this card. The Eiffel Tower image again was sourced from the internet.
4. The butterfly was made using Marianne design Creatables Butterfly 3 die.
5. The side of the note was made with a Cuttlebug embossing folder and then sponged with the same distress inks.


Lastly here's the back of the postcard. The sentiment is computer generated, the rest of the images are rubber stamps from Clear Art Stamps "French Mail".
Tomorrow I'll post part 2 - the altered tin I made to go with this card. So until then
Take care & keep smiling

Sunday, 21 February 2010

Alota Rubber Stamps Challenge 29 - Distress It


Hello on this cold and snowy Sunday. The card I'm about to show you I originally made for the Alota challenge 27 - punch happy, but I forgot to post it DOH. But all is not lost as I had distressed this card aswell so here it is ...


Card size - standard A5 (14.8cm x 21cm)
1. Designer paper by K & Company
2.Both stamps by Alota Rubber stamps - Shed and Garden shelf. Coloured with Derwents coloursoft pencils and Sansador. The Ivy leaves and bottle were gone over with Sakura clear gellyroll glaze pen and a silver gel pen was used on the tools.
3. The "branch" at the top was made with Leone Em ash branch punch and the tiny flower punch was one I bought from a local supermarket. The center of the flowers were dotted with Smooch Gold Lame.
4. Down the bottom the daisy flowers were bought off eBay and the foliage was made with Martha Stewarts Branch and Frond punches, and garden twine used for the bow.
The plant labels were made with a template I found on the internet, and with a graphics program I added the flowers and text then hand cut and punched.
5. the edged of the DP and the main image were distressed using Tim Holtz's paper distresser and his Antique linen distress ink.
Thank you for droppin by and to Emily - yes I am still alive LOL, though not crafting as much as I should be :o)
Take care and keep smiling

Thursday, 4 February 2010

Vintage 60th Birthday card


Hello and a happy New Year, I know I'm late wishing you this, but better late than never :o) I was asked to make this for a friends' sisters' 6oth birthday, she didn't give me much notice so it didn't turn out as I would have liked it too, but saying that it didn't turn out to bad either. Lots of small photo's, but just click on them if you want to see more detail ...


Card size - 6.5" x 6.5" or 16.5cm 16.5cm
Way too many details to go into but here are the basics...
Front of Card - The Designer paper is by K&Co, however I only had one sheet so I did a naughty and cut it to the size I wanted then scanned it and printed it onto some Hessian textured card. I know I shouldn't have but it was the only paper that would do. The photo on the front of the card was sourced from the internet. The February calander is a rubber stamp from Tim Holtz. All the distressing through out the card was done with Tim Holtz's paper distresser and his distress inks - Antique Linen, Frayed Burlap and Tattered Rose. The 60 was hand cut and tripled heat embossed. The hearts and tag were made with Spellbinder dies.
Card Insert - The photo is that of my friends' sister and mother. I scanned the original onto Ilford Galerie smooth pearl paper (it is quite expensive, but I like to use it on special pictures) I then decided to turn it into a postcard. So on a seperated piece of card I printed the sentiment -
"Sisters. Yes we’re just sisters. Our story is not heroic, or even memorable. But when I need support I sense you quietly by me. I always will.~Helen Thomson~ then I used Clear Art "French Mail" stamps, then stuck them both together.
Card Box - The center panel was made using my Cuttlebug and one of their embossing folders, and the folliage/leaves were made using Martha Stewarts' Frond punch.
If I'd have had the time, I would have liked to have made my own flowers and I wanted to make a bookmark aswell.
I have almost finished another card that I was hoping to enter into the http://alotarubberstamps.blogspot.com/ challenge, but I missed it as I had to get this card finished first. Hey ho, when I do finish it I'll post it. So until then
Take care & keep smiling


Monday, 30 November 2009

Vintage style Christmas cards

Hello :o)
Should have posted these a while back, but when I came to assemble them I'd ran out of card and had to reorder anyway here they are now.


Supplies used -
1. Stardream pearlescent Antique gold card
2. Backing paper (front and insert )curtosy of Altered Bits. The snowflake border, bird, sentiment and snowflake are stamps by Inkadinkado all stamped with Versafine Sepia ink and dotted with Stickles gold glitter and Shimmerz Choc-o-lot paint.
3. Main image is mounted onto gold hessian paper, the ovals and snowflakes where made with Nestabilities and Shapeabilies dies.
4. Insert sentiment is computer generated and initial letters coloured with Atyou Gold glitter pen(doesn't show ) and the bird and holly stamps are again by Inkadinkado.
5. My little "calling card" on the back was cut with deckle edge megabilities. The web address is computer generated and the witch and other wording are stamped. Again mounted onto gold hessian paper same but larger die and then run through the cuttlebug with the snowflake impressabilites.
I made 20 of these for my Dad to send out, now I've just got to make my own :o/
Hope you're all keeping well and thank you for still popping by.
Take care & keep smiling from the worst blogger and slowest card maker in the world