My friend Val has just finished her Chemo Therapy treatment and is now awaiting her radio therepy for breast cancer. The cancer is gone (lump rmoved and it hadn't spread to her lymph node) but the treatments are to reduce the risk of it coming back....
Stamps -
Magnolia- Leaning Tilda, You are so special collection
Brick wall, Shabby Chic Summer collection
Bildmalarna- Stone wall with flower pot, Shuttered window
Dies
Memory box - Trellis border
PoppyStamp dies - Leafy Sprig border
Punches
Martha Stewart - Grass die
X-Cut - flower punch
Here's to a long, happy, healthy future.
Take care & keep smiling
Showing posts with label Magnolia. Show all posts
Thursday, 16 June 2016
Thursday, 26 March 2015
Tilda and Edwin friendship card
I made this card for a friend who has been ill and is currantly living in a nursing home. I wanted to make something cheery and bright. I was going to upcycle the Chasing butterflies card I made, but decided the colours weren't bright enough ...
Front image -
Magnolia Chasing Butterflies background and Summer background.
Helloooo - computer generated hand cut and then glazed with Sakura clear glaze pen.
Lace and cross stitch sewn by hand.
Flowers from Wild Orchid Crafts
Inside image -
Magnolia Chasing Butterflies Chasing Tilda, Chasing Edwin and Summer background
Butterfly - Cheery Lynn Designs small exotic butterflies dies coloured with Tim Holtz Mustard Seed and Wild Honey inkpads and sprayed with Glimmer mist Dazzling Diamonds
Flowers - punches from EK Success and Tonic Studios
Foliage - Cheery Lynn mini fanciful flourish die.
Cross stitch - hand sewn
Sentiment page -
Sentiment is computer generated.
Clouds - Memory Box mini clouds die
Cross stitch - hand sewn
All ovals are Spellbinders Grand caliber ovals and scalloped ovals. All images coloured with Derwents coloursoft pencils and Sansodor.
Gingham backing paper made by me on my extremely old graphics program and printed on hessian paper.
Thank you for looking. Take care and keep smiling :)
Front image -
Magnolia Chasing Butterflies background and Summer background.
Helloooo - computer generated hand cut and then glazed with Sakura clear glaze pen.
Lace and cross stitch sewn by hand.
Flowers from Wild Orchid Crafts
Inside image -
Magnolia Chasing Butterflies Chasing Tilda, Chasing Edwin and Summer background
Butterfly - Cheery Lynn Designs small exotic butterflies dies coloured with Tim Holtz Mustard Seed and Wild Honey inkpads and sprayed with Glimmer mist Dazzling Diamonds
Flowers - punches from EK Success and Tonic Studios
Foliage - Cheery Lynn mini fanciful flourish die.
Cross stitch - hand sewn
Sentiment page -
Sentiment is computer generated.
Clouds - Memory Box mini clouds die
Cross stitch - hand sewn
All ovals are Spellbinders Grand caliber ovals and scalloped ovals. All images coloured with Derwents coloursoft pencils and Sansodor.
Gingham backing paper made by me on my extremely old graphics program and printed on hessian paper.
Thank you for looking. Take care and keep smiling :)
Sunday, 15 March 2015
Tilda Birthday card
This was the first Tilda card I made, and I made it in 2004. Don't know why I never put it on my blog !!! Oh well better late than never :)
Take care and keep smiling :)
Labels:
Birthday,
Magnolia,
Magnolia rubber stamp,
Tilda Rubber Stamps
Saturday, 19 May 2012
A Fairy Tale Wedding
Here's a wedding card I made last month but couldn't post until the big day was over.
I used a combination of Whiff of Joy, Magnolia and Paper Artsy rubber stamps to create the images, and the papers are from DCWV Once Upon A Time Matt Stack. The size of the card is 6.5 inches by 6.5 inches. Way too many details to go into but if you want to know anything just drop me a line.
Thank you for looking and take care & keep smiling :o)
I used a combination of Whiff of Joy, Magnolia and Paper Artsy rubber stamps to create the images, and the papers are from DCWV Once Upon A Time Matt Stack. The size of the card is 6.5 inches by 6.5 inches. Way too many details to go into but if you want to know anything just drop me a line.
Thank you for looking and take care & keep smiling :o)
Thursday, 10 March 2011
James Bond 007 Birthday card for my brother
As you may have seen from previous posts, my brother is a big film fan/buff, so the cards I make him tend to reflect that. On this occasion I chose to do something different from the horror cards, and went for action instead ...

Did you notice underneath my logo on the back of the card are the words "Take care & keep smiling Ann" That is a rubber stamp that was made especially for me from my lovely friend Els. When I opened the lovely little box she had made for it and saw the stamp, I'm not ashamed to say I cried. Thank you Els XxXxX
Well as I always say at this point...
Take care & keep smiling :o)
Did you notice underneath my logo on the back of the card are the words "Take care & keep smiling Ann" That is a rubber stamp that was made especially for me from my lovely friend Els. When I opened the lovely little box she had made for it and saw the stamp, I'm not ashamed to say I cried. Thank you Els XxXxX
Well as I always say at this point...
Take care & keep smiling :o)
Sunday, 6 June 2010
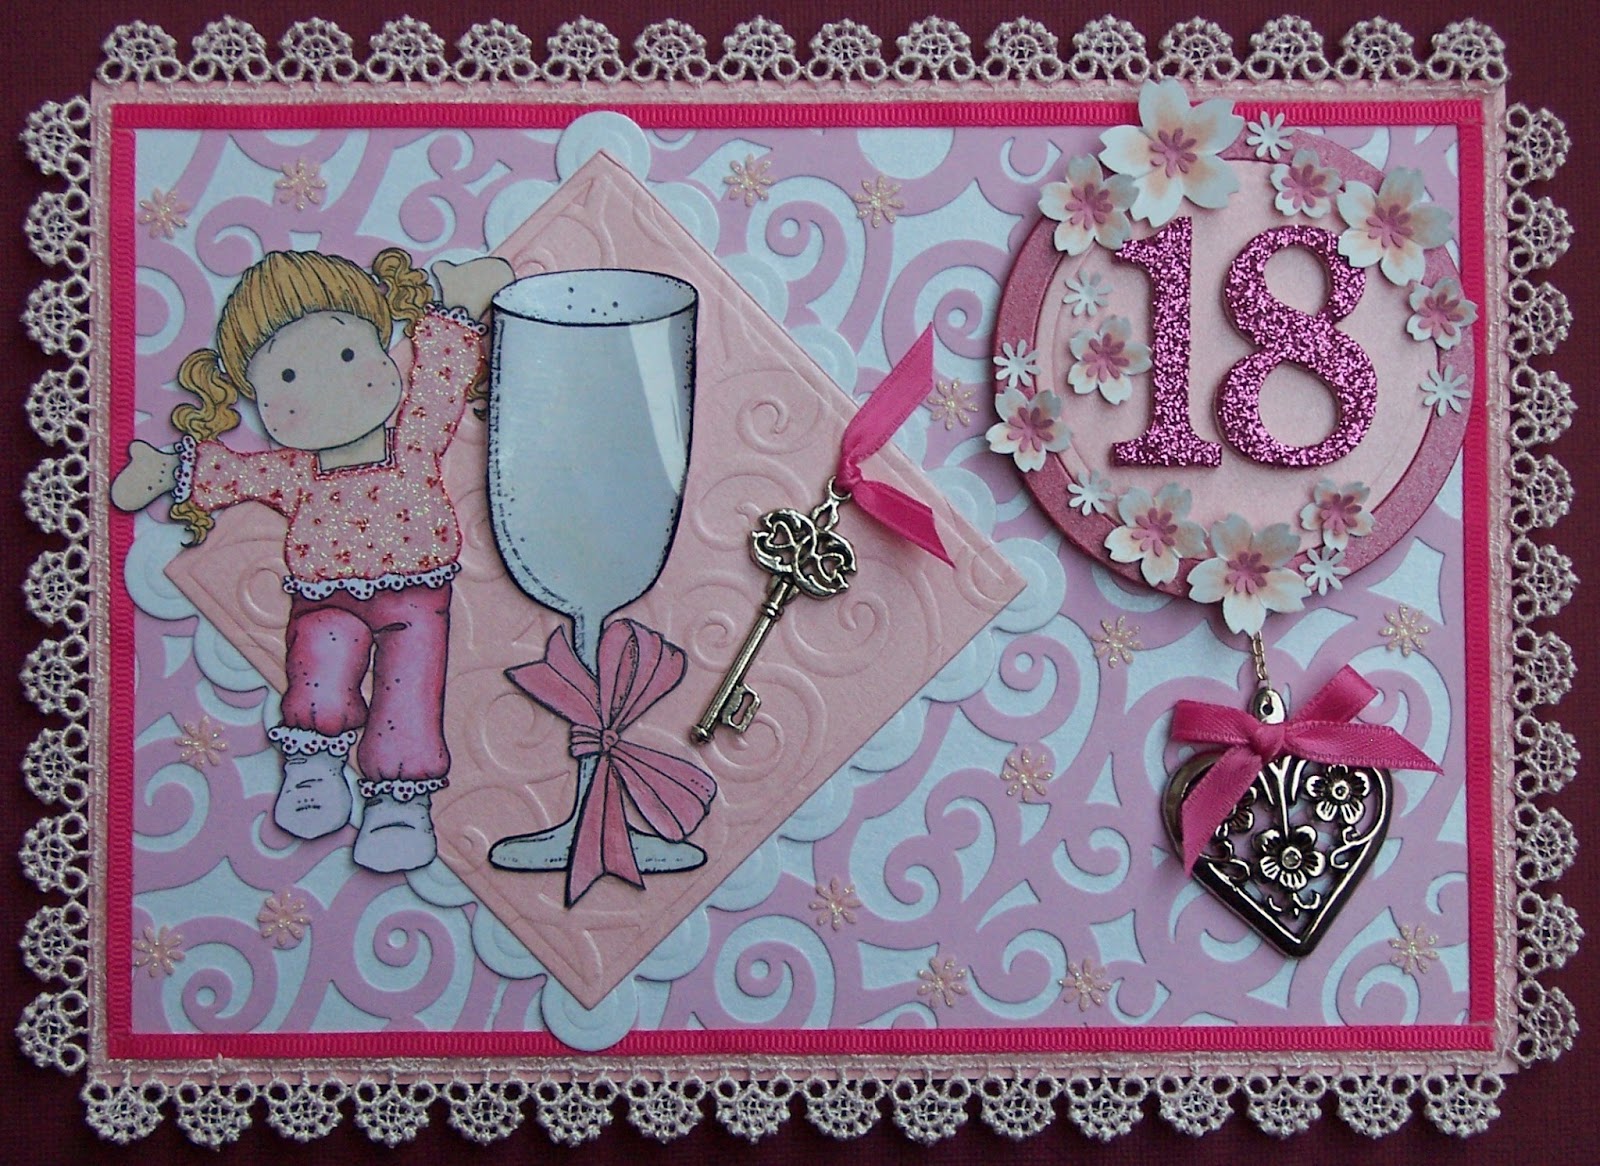
Happy Tilda 18th birthday card, gift set

Tilda strikes again :o) This time for an 18th birthday. I was asked to make this card for a girl who is girly but loves football AND she absolutley adores the husband of Belinda (lady who requested the card). The snag to this is the birthday girl and the husband both support different teams, who happen to be bitter rivals in the world of football. So how to combine all those facts into a card... well here's what I did (lots of photo's, click on them to see more detail) ...
Creative Imaginations Samantha Walker Die Cut swirl card
Glitter paper - flowers, Tilda's top.
Shimmerz paint - "Angel Wings" on champagne flute, "Poinsettia Pink" on footballs.
Smooch paint - champagne flute ribbon.
Atyou glitter pens - Football badges and sentiment.
Tim Holtz - flowers
Rubber Stamps - Happy Tilda and Champagne flute by Magnolia Rubber Stamps - coloured with Derwents Coloursoft pencils and Sansodor.
Printable acetate.
Bling on a budget rhinestones.
K&Co paper lace - inside card.
Numbers 1 and 8 - bought from Hallmark Cards.
Pink cotton lace and ribbons.
Metal key and heart bought from eBay.
Cherry Blossom multi punch by Woodware.
I'm not going to go into great detail as to how the card was made, but the insert backing paper was made by me using a football image sourced from the web and then changed to pink. I then painted over the pink parts with Shimmerz paint. The football badges were sourced from the web changed the colours to various pinks and then coloured over with Atyou glitter pens.
Tilda's top was my first try at paper piecing, I used Stazon Rocket red ink on pink glitter paper and then went over it with a Staedtler fine red pen.
Thank you for looking and take care and keep smiling
Bazzill card stock - Flowers, covering picture frame and picture mount.
Stardream pearlescent card - base card, square, star and circle Nestabilities,.Creative Imaginations Samantha Walker Die Cut swirl card
Glitter paper - flowers, Tilda's top.
Shimmerz paint - "Angel Wings" on champagne flute, "Poinsettia Pink" on footballs.
Smooch paint - champagne flute ribbon.
Atyou glitter pens - Football badges and sentiment.
Tim Holtz - flowers
Rubber Stamps - Happy Tilda and Champagne flute by Magnolia Rubber Stamps - coloured with Derwents Coloursoft pencils and Sansodor.
Printable acetate.
Bling on a budget rhinestones.
K&Co paper lace - inside card.
Numbers 1 and 8 - bought from Hallmark Cards.
Pink cotton lace and ribbons.
Metal key and heart bought from eBay.
Cherry Blossom multi punch by Woodware.
I'm not going to go into great detail as to how the card was made, but the insert backing paper was made by me using a football image sourced from the web and then changed to pink. I then painted over the pink parts with Shimmerz paint. The football badges were sourced from the web changed the colours to various pinks and then coloured over with Atyou glitter pens.
Tilda's top was my first try at paper piecing, I used Stazon Rocket red ink on pink glitter paper and then went over it with a Staedtler fine red pen.
Thank you for looking and take care and keep smiling
Saturday, 8 May 2010
Traveller Tilda Leaving Card
(sigh) I made this card for my lovely team leader Michelle who has moved on to pastures new. I knew I wanted to use the Traveller Tilda stamp but wasn't quite sure what else to do, but once I started I found it VERY hard to stop LOL.

1. DP (designer paper) used through out the card and on the box - Making Memories/Forest Green series. Stardream Pearlescent card. Bazzill cardstock.
2. Punches used - Martha Stewart's Deco Fan border punch and Frond Branch. Nellies' Choice Floral punches and embossers. VERY small daisy punch - unknown make. Corner rounder punch.
3. Stamps used - Magnolia Rubber Stamps - Traveller Tilda, Suitcases and clock. Alota Rubber stamps - Wall/window. Watercolour Stamps - cobblestones.4. Embellishments - Tim Holtz - Journalling tickets. K & Company - paper ribbon. Bling on a Budget - Rhinestones/gems.
5. Other items used -Derwents Coloursoft pencils and Sansador (Colouring in stamps) Tim Holtz Distress ink pads (flower centers and card edges). Sakura clear Gellyroll glaze pen (clock face, eyes, buttons, case handle)) Krylon Copper pen (colour banding on suitcases) Atyou glitter pens (wording on front of card, Tilda's hat flowers). Pink glitter card (flower centres)
6. All sentiments/wording - computer generated. To get the wording on the journaling ticket, I first printed the words onto a piece of A6 card then using a small piece of double sided tape I positioned the ticket over the words (I held the paper up to the light to get it right, if you've got a light box that would be even better) then fed it through the printer again.
So there you have it, I really enjoyed making this card, though I didn't like the reason I made it, I shall miss Michelle, but I am very happy that she is finally getting to where she wants to be.
Thank you for looking and take care & keep smiling
Monday, 28 September 2009
Tilda with Roses or Roses for Rosella
I made this card about three weeks ago for my friend Rosella's birthday....


1. Backing papers inside and outside of the card are from Bearly Mine Designs CD Rom.
2. Magnolia's Tilda with roses and Rose rubber stamps. Colured with Derwents Coloursoft pencils, Sansodor, Atyou red glitter pen and Sakura clear Gellyroll glaze pen. Background for Tilda was made using Tim Holtz Scattered Straw ink pad.
3. Roses on the front where plain white but the edges where then painted with Shimmerz Royal red paint.
4. Frames for Tilda and inserts where made with Nestabilities and heat embossed (about 4 layers)
5. Leaves - L-Em punch and Bazzil card.
6. Sentiments are computer generated and gone over with Atyou red glitter pen.
7. Gold corner and border peel offs used on the inserts.
8. Metal corner embellishments and raffia bows on the front.
Take care & keep smiling
1. Backing papers inside and outside of the card are from Bearly Mine Designs CD Rom.
2. Magnolia's Tilda with roses and Rose rubber stamps. Colured with Derwents Coloursoft pencils, Sansodor, Atyou red glitter pen and Sakura clear Gellyroll glaze pen. Background for Tilda was made using Tim Holtz Scattered Straw ink pad.
3. Roses on the front where plain white but the edges where then painted with Shimmerz Royal red paint.
4. Frames for Tilda and inserts where made with Nestabilities and heat embossed (about 4 layers)
5. Leaves - L-Em punch and Bazzil card.
6. Sentiments are computer generated and gone over with Atyou red glitter pen.
7. Gold corner and border peel offs used on the inserts.
8. Metal corner embellishments and raffia bows on the front.
Take care & keep smiling
Labels:
Bearly Mine Designs,
Birthday,
L-Em,
Magnolia,
Nestabilities,
Shimmerz,
Tilda Rubber Stamps,
Tim Holtz
Saturday, 12 September 2009
Winter Wonderland Week 15 - Frosty the Snowman
As I've been away from blogging for a while I thought I'd get myself back on the map by entering a challenge, and as I've been following the Winter Wonderland Challenge blog for a while but never entered I thought this would be a good place to start. And lets face it WHO can resist a snowman :o) ...
I do have a snowman stamp but didn't want to use it, so I went scouting round the Internet to see what I could find, and found this lovely snowman on a children's colouring page. Do you think I can find that page again ???? No, argghhhh I hate it when that happens. Anyway I've changed it slightly from the original picture, and so as I could colour it in without the ink smudging, I printed it in a pale grey colour and then went over it with a waterproof ink pen and then coloured it with Derwent coloursoft pencils and Sansodor, and the band on his hat was gone over with Atyou Spica clear glitter pen. The owl and birds are Magnolia stamps coloured the same as the snowman and on their beaks and their eyes I went over SEVERAL times with Sakura clear Gelly roll glaze pen. The snowman's nose was gone over again several times with Sakura Gelly roll Christmas red glaze pen. The sprig in his hat is the top part of Martha Stewart's branch punch and the berries were made with Stickles Christmas red glitter glue.
The arched backing paper is one I made on the computer, and the snowflakes where then painted over with Shimmerz Angel Wings paint (not that you can see on the photo's).This was then mounted onto silver Mirri silk card that had been run though the Cuttlebug with Impressabilities Snowflake embossing plate. Because the card is bigger than the embossing plate I first cut away the frame that surrounds the plate so as to get a nice continuous pattern. oh and by the way the arches were both cut by hand. The backing paper is from Bearly Mine Designes Designer Extreme Vol. 1 CD. The icicles are from a Christmas tree garland I got in the sales, and the snow at the bottom of the snowman's feet is Flowersoft Polar White, I was expecting it to be white but as you can see it's transparent :o( Oh well. I think I covered everything. As I can't find the site I got the snowman picture from here he is... But remember this is NOT my art work and I take NO credit for it...


And here's my altered version.
PS. I did a waistcoat for him, but me and my Dad thought he looked on this occasion better without it, but I think I may well do another with his waistcoat as this was such a fun card to make.
Take care & keep smiling
PS. The bottom photo may look like a blank but when you print it it comes out a pale grey. That's so as you can go over it with what ever colouring medium you chose :o)
Subscribe to:
Posts (Atom)